

In today’s digital landscape, securing your network infrastructure is paramount. Protecting your data from unauthorized access is crucial, whether managing a home network, a small office setup, or an extensive enterprise network. SSL certificates are one of the best ways to ensure secure communication within your network. If you’re using pfSense as your firewall, creating an internal SSL certificate to secure communications with the pfSense web interface (GUI) is essential.
In this guide, we’ll take you through the entire process of creating an internal SSL certificate for your pfSense firewall, making it easy to secure your network traffic. Even if you’re not highly technical, we’ll keep the instructions straightforward and user-friendly.
What is SSL, and Why Is It Important for pfSense Firewall?
SSL (Secure Sockets Layer) is a protocol that establishes an encrypted link between a web server and a client (typically a browser). This encryption ensures that sensitive data exchanged between the two parties cannot be intercepted or tampered with by third parties. In other words, SSL provides data protection and enhances privacy during transmission.
Regarding pfSense — an open-source firewall that offers robust security features — having an SSL certificate for its web interface (GUI) is crucial. Without an SSL certificate, communication between your browser and pfSense is unencrypted, making it vulnerable to attacks. By implementing an SSL certificate, you secure your communication, ensuring only trusted parties can access your firewall settings and configurations.
While pfSense provides an internal SSL certificate by default, it’s often beneficial to generate your own custom internal SSL certificate to gain greater control over your network’s security.
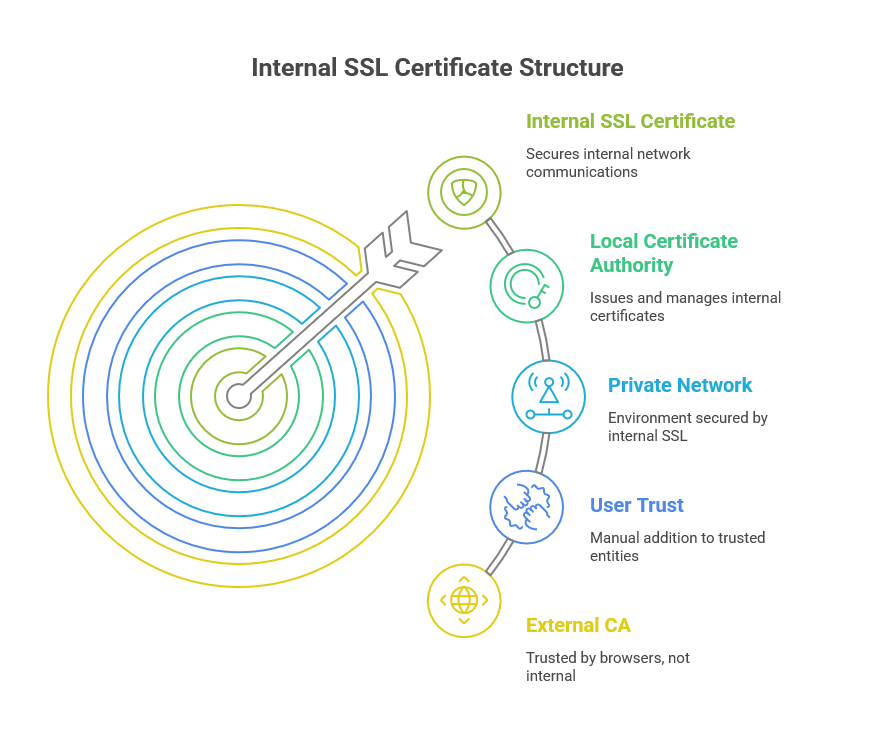
What is an Internal SSL Certificate?
An internal SSL certificate is a self-signed certificate created using a local Certificate Authority (CA) within your organization. It’s meant to secure communications within your private network rather than for public-facing websites. These certificates are ideal for non-public, internal services like pfSense’s web GUI.
Unlike certificates issued by a trusted third-party CA (which browsers automatically trust), external authorities do not recognize an internal SSL certificate. Therefore, users might see warnings in their browsers unless they manually add the certificate as a trusted entity. However, creating an internal SSL certificate is often cost-effective and secure for internal use.
Why Use an Internal SSL Certificate for pfSense?
There are several key reasons why creating an internal SSL certificate for pfSense is a great choice:
-
Enhanced Security: An internal SSL certificate ensures that all communications between your pfSense firewall and its web interface are encrypted, preventing unauthorized access to sensitive data.
-
Cost-Effective: Using an internal SSL certificate can save money that would otherwise be spent on purchasing external certificates.
-
Complete Control: With an internal certificate, you have full control over your certificate management. You can generate, renew, and revoke certificates as needed.
-
Simple Management: Once set up, internal certificates are easy to manage within your network, especially if you have multiple pfSense devices to configure.
Step-by-Step Guide: How to Create an Internal SSL Certificate for pfSense
Let’s now dive into the step-by-step process of creating an internal SSL certificate for pfSense. We’ll keep things simple and easy to follow.
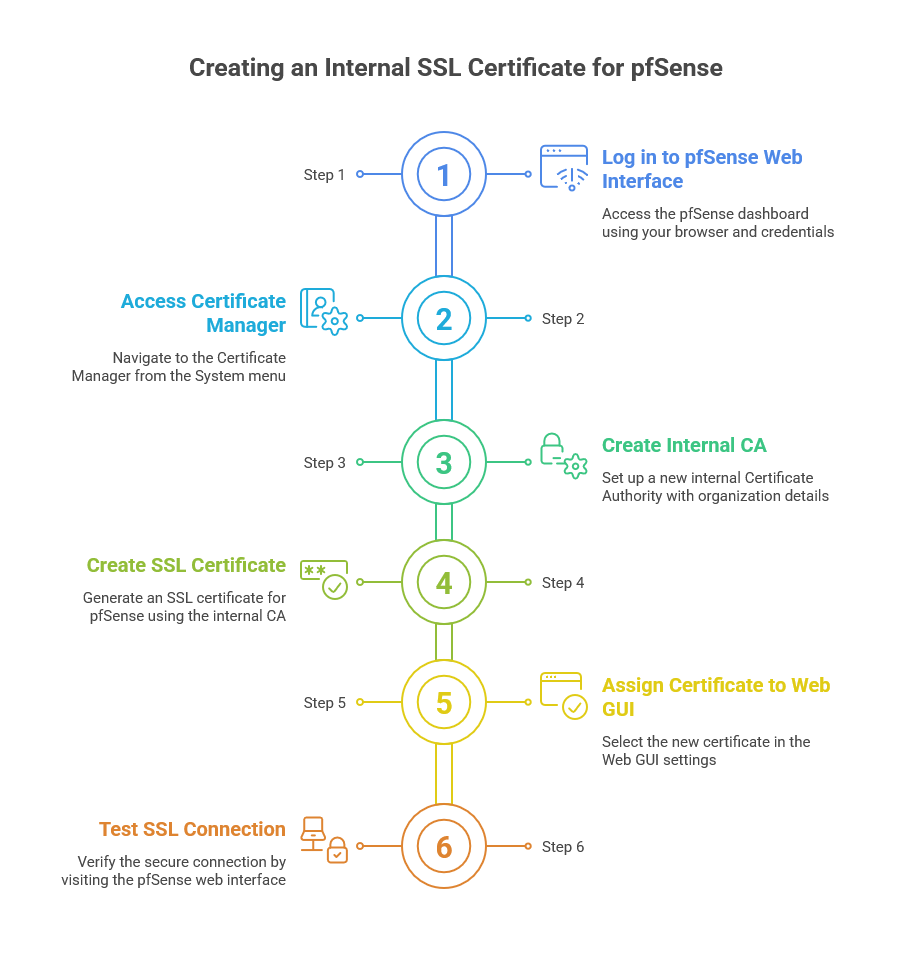
Step 1: Log in to pfSense Web Interface
First, open your browser and go to your pfSense firewall’s web interface. The default IP address for pfSense is typically, but if you have customized it, use the relevant IP address.
-
Type in your browser’s address bar (for example.
-
Enter your username and password to log into the pfSense dashboard.
Step 2: Access the Certificate Manager
Once logged into pfSense, follow these steps to navigate to the Certificate Manager:
-
On the pfSense dashboard, click the System menu in the top navigation bar.
-
From the dropdown, select Cert. Manager. This will take you to the Certificate Manager page, where you can create and manage certificates.
Step 3: Create a New Internal Certificate Authority (CA)
An Internal Certificate Authority (CA) is required to create and manage the SSL certificates. Here’s how to create one:
-
In the Cert. In the manager section, click on the CAs tab.
-
Click the + Add button to create a new CA.
-
In the Add CA form, fill in the following fields:
-
Descriptive Name: Give your CA a name (e.g., “pfSense Internal CA”).
-
Method: Choose “Create an internal Certificate Authority”.
-
Key Type: Choose RSA.
-
Key Length: Set this to 2048 bits for optimal security.
-
Lifetime: Set this to 3650 days (which is 10 years).
-
Distinguished Name: Fill in your organization’s details, such as country, state, and city.
-
-
After completing the form, click Save to create the Certificate Authority (CA).
Step 4: Create the SSL Certificate for pfSense
Now that you have your internal CA set up, the next step is to create the SSL certificate to secure your pfSense web interface.
-
Go to the Certificates tab in the Cert. Manager section.
-
Click + Add/Sign to create a new certificate.
-
In the Add Certificate form, fill out the following information:
-
Descriptive Name: Enter a name for your certificate (e.g., “pfSense SSL Certificate”).
-
Certificate Authority: Choose the internal CA you just created.
-
Certificate Type: Select Server Certificate.
-
Key Type: Choose RSA.
-
Key Length: Set this to 2048 bits.
-
Lifetime: Set the certificate’s lifetime to 365 days or as required.
-
Common Name: Enter the IP address or domain name used to access pfSense
-
Alternative Names: (Optional) Add any other domains or IP addresses if needed.
-
-
Once you’ve filled out the form, click Save. Your SSL certificate is now created.
Step 5: Assign the SSL Certificate to pfSense Web GUI
Now, let’s assign the SSL certificate to pfSense so that it is used for the web interface:
-
Navigate to System > Advanced in the top menu.
-
Scroll down to the Web GUI section.
-
From the SSL Certificate dropdown, select the certificate you created earlier.
-
Scroll down and click Save to apply the changes.
Step 6: Test the SSL Connection
After applying the certificate, you can test the secure connection:
-
Open a new browser window and navigate to
-
Your browser should now establish a secure, encrypted connection with the firewall using the new SSL certificate.
Dealing with Browser Warnings
If your browser displays a warning stating that the certificate is not trusted, this is expected for internal SSL certificates. To resolve this:
-
Download the Certificate Authority (CA) you created from the pfSense CAs section.
-
Import the CA into your browser’s trusted certificate store to prevent future warnings.
Troubleshooting SSL Certificate Issues
Here are a few common issues and solutions:
-
Untrusted Certificate Warnings: Add your internal CA to your browser’s trusted certificate store to avoid warnings.
-
SSL Errors: Double-check that the Common Name in the certificate matches the domain or IP you use to access pfSense.
-
Expired Certificates: SSL certificates have expiration dates. If your certificate expires, create a new one and assign it to pfSense.
Frequently Asked Questions (FAQs)
1. What is the difference between an internal and external SSL certificate?
-
An internal SSL certificate is generated within your organization, while an external SSL certificate is issued by a third-party Certificate Authority (CA) and is trusted by browsers.
2. Can I use a self-signed SSL certificate for pfSense?
-
Yes, you can use a self-signed certificate, but browsers will not trust it unless you import the CA certificate into the browser’s trusted store.
3. How long does an SSL certificate last?
-
SSL certificates typically last between 1 and 3 years. You can set the expiration date when you create the certificate.
4. How can I renew my SSL certificate for pfSense?
-
You can renew your SSL certificate by creating a new one with an updated expiration date and re-assigning it to pfSense.
5. Why is my SSL certificate not working in pfSense?
-
If the SSL certificate isn’t working, ensure that the Common Name matches the IP address or domain you’re using to access pfSense and that the certificate is correctly assigned in the pfSense settings.
Creating an internal SSL certificate for your pfSense firewall is a simple yet effective way to secure your network and prevent unauthorized access. Following the steps outlined in this guide, you can set up a secure, encrypted connection to pfSense, ensuring your firewall management is safe and protected from cyber threats. Remember to renew your certificates regularly and ensure your internal CA is trusted within your network to avoid any disruptions in secure communication.